The Comprehensive Guide to Removing Tape Residue from Wood
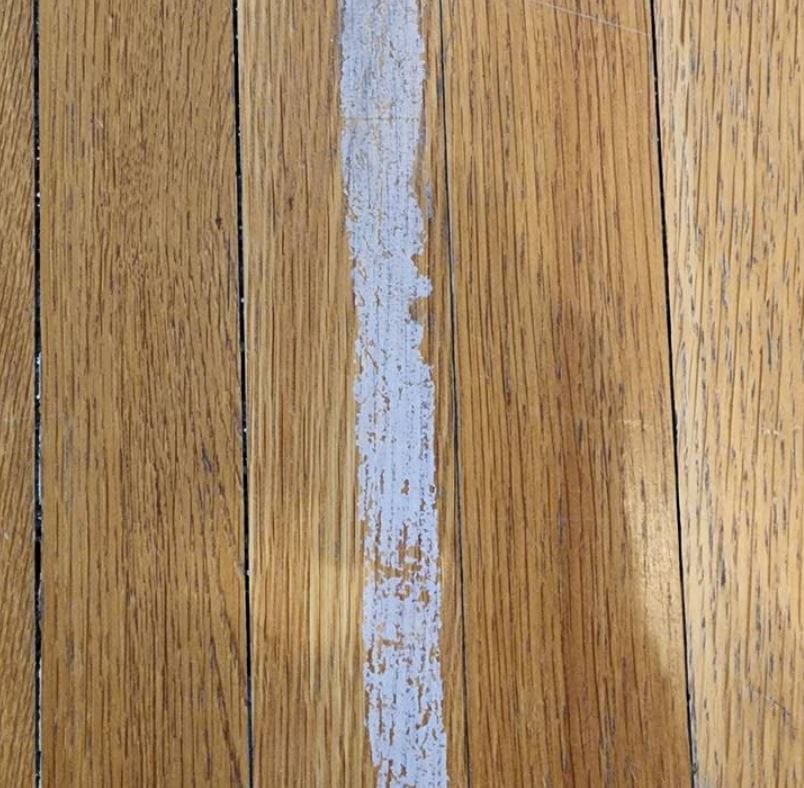
Tape residue on wood surfaces—whether from painter’s tape, packaging tape, or stubborn labels—presents a unique cleaning challenge. The porous nature of wood, combined with the variety of surface finishes (varnish, lacquer, paint, or oil), means that the wrong removal method can cause more damage than the residue itself. This guide provides professional, step-by-step strategies to safely restore your wood surfaces to their original condition.
Assessing the Wood Surface: The Critical First Step
Before applying any cleaning agent, it is essential to identify the type of wood finish you are dealing with. Unfinished or raw wood is highly porous and can absorb liquids, leading to stains or warping. Sealed or finished wood (with polyurethane, varnish, or lacquer) is more resistant but can be damaged by harsh chemical solvents like acetone.
The Golden Rule: Always test your chosen method on a small, inconspicuous area (such as the back of a piece of furniture or inside a cabinet) before proceeding.
Method 1: Mechanical Removal (Heat and Scraping)
For residue that is fresh or relatively thick, physical removal should be your first line of defense. It minimizes the use of liquids that could potentially damage the wood.
1. The Heat Technique
Heat is one of the most effective ways to soften the adhesive polymers in tape, making them easier to peel away.
- Procedure: Use a hairdryer on a medium setting and hold it a few inches away from the residue. Heat the area for 30 seconds to a minute until the adhesive becomes pliable.
- Action: Gently lift the residue with your fingers or a plastic scraper.
- Caution: Avoid overheating, as this can cause the wood finish to bubble or crack. Be aware that excessive heat can sometimes make some adhesives “stickier” before they release.
2. Gentle Scraping
- Tool: Use a plastic scraper, a blunt butter knife, or the edge of an old credit card. Never use metal blades, as they will scratch the wood surface.
- Technique: Hold the scraper at a low angle (close to flat) and push the residue away from you. Work slowly to avoid gouging the wood.
Method 2: Solvent-Based Removal (Household Solutions)
If the mechanical method fails, the next step is to use a solvent to dissolve the adhesive chemically. The choice of solvent depends on the type of adhesive and the resilience of the wood finish.
1. Isopropyl Rubbing Alcohol
This is generally considered the safest and most effective solvent for finished wood.
- Procedure: Dampen a soft, clean cloth with rubbing alcohol (70% concentration or higher). Do not saturate it; wring out excess liquid.
- Action: Gently rub the residue in a circular motion. The alcohol will quickly dissolve most tape adhesives. Wipe the area clean with a damp cloth.
2. White Vinegar
A mild acid that is safe for most finished surfaces and effective at breaking down adhesives.
- Procedure: Soak a cloth or paper towel in white vinegar and place it over the residue for approximately 5 minutes.
- Action: The vinegar will soften the residue, allowing you to wipe it away easily.
3. Oils (Mineral, Baby, or Cooking Oil)
Oils work by penetrating the adhesive and breaking its bond with the wood surface.
- Procedure: Apply a small amount of mineral oil, baby oil, or olive oil to a cloth and rub it into the residue.
- Action: Let it sit for a few minutes to penetrate, then wipe away the softened residue.
- Important: For porous or unfinished wood, oil can cause a dark stain. This method is generally recommended only for sealed surfaces.
Method 3: Commercial Products and Professional Solvents
1. WD-40
This multi-purpose lubricant is effective for removing sticker and tape residue.
- Procedure: Spray a small amount of WD-40 onto the residue and let it sit for a few minutes.
- Action: Wipe the area with a clean cloth.
- Caution: WD-40 is highly flammable and can damage specific surface finishes, such as lacquer or melamine. Test thoroughly before use.
2. Commercial Adhesive Removers
Products like “Cleanup Solvent 22” are specifically formulated for tough adhesive removal. Unlike acetone, these are designed to be non-oily and leave no residue behind.
- Safety Note: Many commercial removers contain strong solvents. Always ensure adequate ventilation and follow the manufacturer’s instructions.
Comparison of Methods and Risk Assessment
The following table provides a quick reference for selecting the appropriate method based on your wood type and residue severity.
| Method | Best For | Wood Types | Risk Level | Effectiveness |
|---|---|---|---|---|
| Hairdryer (Heat) | Fresh, thick residue | All types (low liquid risk) | Low | High (Softening) |
| Rubbing Alcohol | Stubborn adhesive, sticker residue | Finished/Sealed wood | Low | High |
| White Vinegar | General adhesive residue | Finished/Sealed wood | Low | Moderate |
| Oils (Mineral/Olive) | Tape residue on sealed furniture | Sealed wood only | Moderate (May stain raw wood) | Moderate |
| WD-40 | Heavy-duty tape residue | Durable finishes | Moderate (May damage lacquer) | High |
| Acetone/Nail Polish Remover | Epoxy or industrial adhesives | Water-resistant finishes only | High (Will dissolve many lacquers/paints) | Very High (often permanent damage) |
Post-Cleaning Care and Restoration
After successfully removing the residue and cleaning the area, it is crucial to finish the job properly:
- Neutralize: Wipe the area with a cloth dampened with warm water and mild dish soap to remove any solvent or oil residue.
- Dry Thoroughly: Use a dry, clean cloth to remove all moisture from the wood surface immediately to prevent water damage.
- Polish: If the finish looks dull (particularly after using oil-based products), apply a wood polish or a dedicated wood conditioner to restore the original sheen and protect the surface.
Conclusion
Removing tape residue from wood is a task that demands patience and the right approach. By prioritizing mechanical removal (heat/scraping) and moving to mild solvents like rubbing alcohol before attempting aggressive chemicals, you can effectively clean the wood without compromising its finish. Always remember the mantra: Test first, and err on the side of gentleness.