What to Expect During a Professional Roof Installation
Getting a new roof is one of the most important investments a homeowner can make. Yet many people feel anxious about the process because they are unsure how long it takes, what the crew will do, and how much disruption to expect. This guide walks you through each stage of a professional roof installation so you can prepare confidently and protect your home during the project.
Understanding the Roof Installation Timeline
A professional roofing installation typically follows a predictable sequence. It begins with an inspection, continues with preparation and removal, and ends with a detailed cleanup and final walkthrough.
This is why a reputable roofing company in Charlotte will reschedule installation rather than risk unsafe working conditions or compromised results.
Initial inspection and planning
Before installation day, your contractor conducts a detailed inspection of your existing roof. They check deck condition, shingle wear, flashing, moisture damage, and ventilation needs. According to the International Association of Certified Home Inspectors, inadequate ventilation is one of the most common contributors to premature roof failure. Their findings help determine the materials, timeline, and scope of work.
Material selection and permits
Most homeowners select between asphalt shingles, metal roofing, or synthetic materials. Your contractor may handle permits, which many municipalities require for structural or exterior work. Permit offices often publish residential roofing guidelines to protect both homeowners and crews.
Scheduling the installation date
Roofing is weather dependent. Rain or high winds can delay installation. The National Weather Service reports that even moderate wind events can increase safety risks for roof workers because wind can lift materials and reduce footing. This is why reputable contractors reschedule rather than push through unsafe conditions.
Preparing Your Home Before the Crew Arrives
A few simple steps can help your installation go smoothly and prevent damage to belongings.
Clear driveways and outdoor areas
Roofers need space for vehicles, ladders, and the debris trailer. Clearing vehicles and patio items reduces the risk of accidental impacts during tear off.
Create safety zones
Roof installations are noisy. You may want to move pets to a quiet room and inform neighbors about the project. Following occupational safety recommendations, crews will designate specific work areas to keep everyone protected.
Prepare the inside of your home
Hammering can cause vibrations. Remove fragile items from walls or shelves and consider covering attic belongings to keep dust from settling on them.
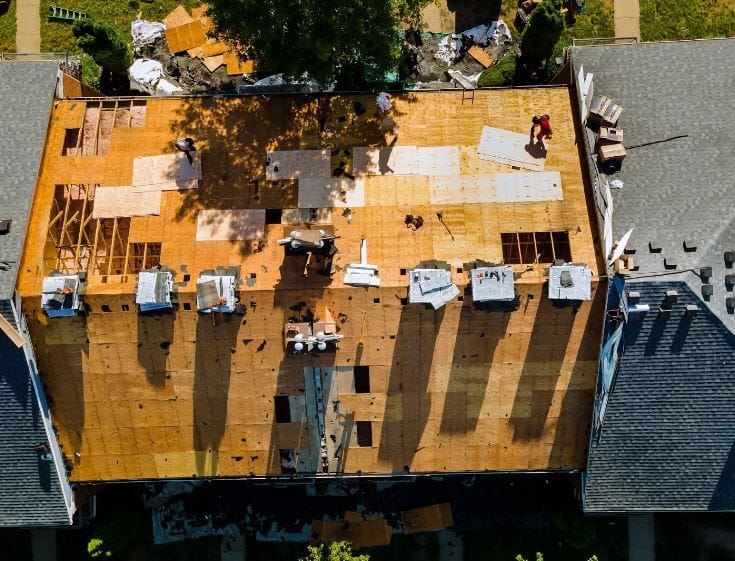
The Tear Off Stage
Tear off is usually the loudest and most active part of the day. The crew removes old shingles, nails, underlayment, and flashing.
Why tear off matters
Although some contractors offer to install new shingles over an old layer, manufacturers make it clear that full tear off improves longevity and warranty coverage. Removing old layers exposes any soft or damaged decking that must be replaced before the new roof goes on.
Deck repairs and cleanup
Once the roof is bare, the crew inspects the decking carefully. Any compromised sections are replaced. Debris is placed into disposal trailers and the yard is swept regularly to reduce stray nails.
Installing Your New Roofing System
Once the surface is prepared, the new roofing system is installed step by step.
Underlayment and protective barriers
Crews first lay moisture protection materials, including synthetic underlayment and ice and water shield in vulnerable areas. According to FEMA, proper roof underlayment significantly reduces water intrusion during storms and protects the home against long term moisture damage.
Source: https://www.fema.gov/fact-sheet/protect-your-property-roof-underlayment
Updating flashing and ventilation
Metal flashing is installed around chimneys, vents, skylights, and valleys. Ventilation is also checked. Improving airflow can help reduce attic heat and increase shingle lifespan. Energy efficiency nonprofits recommend balanced intake and exhaust systems to prevent moisture buildup.
Shingle installation
Shingles are installed in overlapping rows starting at the lower edge. Contractors follow manufacturer instructions for nail placement, spacing, and alignment. These details protect your warranty and ensure the roof resists wind uplift.
Quality checks
Throughout the day, the lead installer verifies that rows are straight, flashing is sealed, and ventilation components are properly secured.
Final Cleanup and Inspection
Professional roofers complete a thorough cleanup and inspection once installation is finished.
Ground cleanup
Roofing debris is removed and magnets are used to collect nails around the property. This step reduces hazards for children, pets, and lawn equipment.
Contractor inspection
The project manager checks flashing, ridge caps, ventilation openings, and material sealing. A well done inspection confirms the roof meets manufacturer and workmanship standards.
Homeowner walkthrough
Reputable companies invite homeowners to review the finished installation. This is your chance to ask questions and confirm that the project matches the agreement.
Understanding Warranties
You will receive two types of warranties.
- Manufacturer warranty covers defects in roofing materials.
- Workmanship warranty covers errors in installation.
Read the documentation and register your warranty if required. Skipping registration can limit coverage. Also ask your roofing company to explain what actions void coverage, such as improper repairs or adding new fixtures without flashing.
Long Term Care for Your New Roof
A new roof still needs simple maintenance to extend its lifespan.
- Inspect gutters twice a year.
- Trim back branches that touch the roof.
- After major storms, check for debris or missing shingles.
Home maintenance nonprofits recommend an annual roof inspection to catch issues early. If you want professional help evaluating or maintaining your roof, you can contact specialists who provide Residential Roofing in Calgary and offer full inspection and installation services.