The Complete Guide to Cleaning Pool Tiles Above the Water Line: Diagnosis, Methods, and Prevention
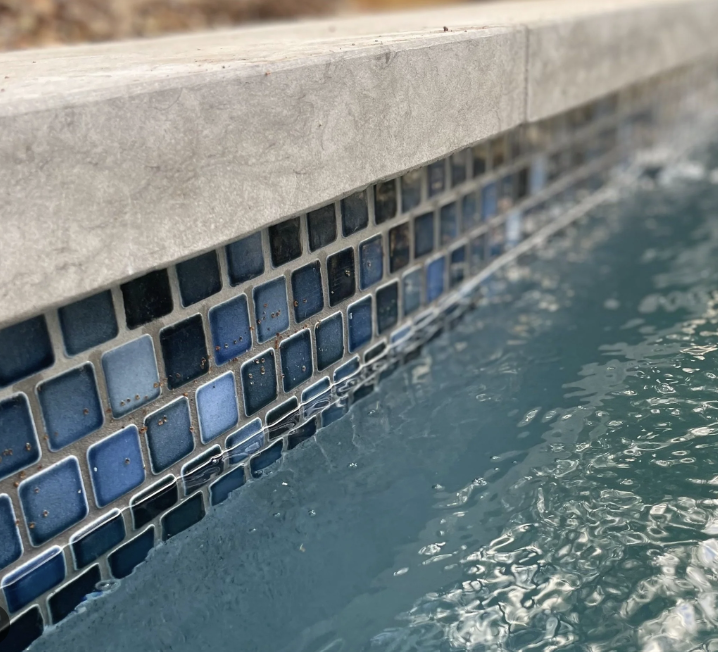
The ring of white crust and grimy film around your pool’s waterline is not merely an aesthetic problem; it is a chemical and physical record of every evaporation cycle, every swimmer, and every imbalance in your pool’s water. Cleaning pool tiles above the water line requires a precise diagnostic approach because the deposit you see is rarely a single substance. It is a layered composite of mineral residue, body oils, sunscreen, and environmental debris that has bonded to the tile and grout.
This guide provides a professional, structured methodology for identifying the deposit, selecting the correct removal technique, and implementing a prevention protocol that minimizes recurrence. The core principle is escalation: always begin with the least aggressive method and proceed only when necessary to avoid permanently etching or scratching the tile surface.
1. Diagnosing the Deposit: What Are You Actually Removing?
Before applying any chemical or abrasive, you must identify the nature of the buildup. Treating an oil-based scum line with an acid will not work, and using a pumice stone on a delicate glass tile can cause irreversible damage. The table below distinguishes the primary types of waterline deposits.
| Deposit Type | Visual Characteristics | Chemical Nature | Correct Removal Approach | What to Avoid |
|---|---|---|---|---|
| Calcium Carbonate Scale | White, chalky, flaky crust; scrapes with a fingernail; fizzes when a drop of acid is applied | Alkaline mineral precipitate (evaporite) | Mild acid cleaners, pumice (on suitable tile), scale removers | Wire brushes, high-pressure washing on old grout |
| Calcium Silicate Scale | Grayish-white, dense, hard; does not react to acid | Harder mineral complex | Professional bead blasting; pumice with heavy effort | Repeated acid washing (ineffective and damaging) |
| Scum Line (Organic/Oil) | Dark brown, black, or greenish greasy film; feels slick | Body oils, sunscreen, cosmetics, pollen | Degreasers, enzyme cleaners, mild soap, soft brush | Acidic cleaners (they set the oils rather than remove them) |
| Algae/Biofilm | Green, yellow, or black patches; often in shaded or poorly circulated areas | Biological growth feeding on oils | Chlorine-based treatment, physical scrubbing | Sealing over active growth (traps moisture and organics) |
The scientific consensus is that the white crust above the waterline is technically an evaporite, not a true “scale” caused solely by high LSI (Langelier Saturation Index) . Water wicks up the porous grout and tile face by a fraction of an inch to three-quarters of an inch. As that thin film evaporates, the distilled water leaves, but the dissolved solids—primarily sodium chloride, calcium carbonate, and various mineral salts—remain on the surface . This distinction matters because it means that even a perfectly balanced pool will eventually develop some waterline residue; the goal is management, not absolute prevention.
2. Preparation: Tools, Safety, and Water Level Management
Professional cleaning begins with proper setup. Rushing this phase leads to contaminated pool water, damaged adjacent surfaces, or personal injury.
Essential Toolkit
- Soft nylon brushes and non-abrasive scrub pads (for routine scum and light scale)
- Pool-grade pumice stone (for ceramic and porcelain tile only; never on glass, fiberglass, vinyl, or plaster)
- Chemical-resistant gloves and safety goggles (mandatory for any acid use)
- pH test kit (to verify water chemistry before and after cleaning)
- Bucket, sponge, and garden hose for rinsing
- Commercial tile cleaner (enzyme-based for oils, acid-based for calcium)
Water Level Adjustment
For any cleaning that involves chemicals or abrasives, lower the pool water level by 3 to 6 inches below the waterline tile . This exposes the full band of buildup and prevents cleaning agents from diluting immediately into the pool. If you are using acid, this step is non-negotiable; acid dripping into the pool will rapidly depress pH and alkalinity, requiring extensive rebalancing afterward.
3. The Cleaning Protocol: A Step-by-Step Escalation Strategy
Step 1: The Gentle Baseline (Routine Scum and Light Film)
For weekly or biweekly maintenance, or for pools with only a light oil film, begin with the least invasive method.
- Mix a solution of warm water and a few drops of mild dish soap (or a dedicated enzyme-based pool tile cleaner).
- Scrub the tile and grout lines with a soft nylon brush.
- Rinse thoroughly.
This step removes the organic food source (oils and sunscreen) that allows algae to adhere and that binds loose minerals into a sticky matrix. If the tile feels smooth after rinsing, you have addressed the scum line and can stop. If a gritty or chalky texture remains, proceed to Step 2.
Step 2: Mild Acid for Carbonate Scale (Vinegar or Commercial Scale Remover)
White vinegar (acetic acid) is sufficient for thin, early-stage calcium carbonate deposits.
- Spray or wipe undiluted white vinegar onto the affected tile.
- Allow it to dwell for 3–5 minutes. Do not let it dry.
- Scrub with a nylon brush.
- Rinse thoroughly.
For thicker carbonate scale, a commercial pool tile calcium remover (often citric or sulfamic acid-based) is more effective and safer to handle than muriatic acid . Apply to a damp cloth or brush, work in small sections of 2–3 feet at a time, and rinse before moving on .
Step 3: Mechanical Abrasion with Pumice (Hard Tile Only)
If the scale remains after chemical treatment and the tile is unglazed ceramic, porcelain, or natural stone, a wet pumice stone can physically shear the deposit from the surface.
Critical Technique: Keep both the pumice stone and the tile soaking wet at all times. Work in small circular motions with light pressure. Dry pumice or excessive pressure will scratch the glaze .
Absolute Contraindications: Never use pumice on glass tile, glazed decorative tile, fiberglass, vinyl liners, or exposed plaster. On these surfaces, pumice causes permanent cosmetic damage that cannot be polished out.
Step 4: Diluted Muriatic Acid (Severe Carbonate Scale—Professional Caution)
Muriatic acid (hydrochloric acid) is the most aggressive chemical option available to a homeowner. It is effective against carbonate scale but dangerous to the user, the tile grout, and the pool chemistry.
If you choose this method:
- Dilute the acid 1:10 with water (always add acid to water, never water to acid) in a spray bottle .
- Wear goggles, acid-rated gloves, and long sleeves.
- Work on a calm day; never spray into wind.
- Mist the diluted acid onto the tile, let it sit for no more than 30 seconds, scrub briefly with a nylon brush, and rinse immediately and thoroughly .
- Test and rebalance pool pH and total alkalinity after the water level is restored.
Many industry professionals recommend that homeowners avoid muriatic acid entirely and use commercial sulfamic-acid-based tile cleaners instead. Sulfamic acid is gentler on grout, safer to handle, and less likely to cause a severe pH crash .
Step 5: Professional Bead Blasting (Heavy or Silicate Scale)
When scale is thicker than a dime, has hardened over multiple seasons, or is identified as calcium silicate (acid-resistant), no amount of scrubbing or chemical application will restore the tile efficiently. Professional bead blasting (also called kierserite or glass bead blasting) is the standard intervention.
A technician uses a specialized rig to project a fine, soft media—typically magnesium sulfate (kierserite) or glass beads—at the tile under controlled pressure. The media fractures on impact and shears the scale away without cutting into the tile glaze underneath . This is a specialist service; improper media selection or excessive pressure can damage grout lines or etch the tile. Typical residential costs range from $500 to $1,500 depending on pool perimeter and scale severity .
4. Comparative Analysis: Cleaning Methods at a Glance
The following table summarizes the suitability of each method across different tile types and deposit severities to aid in decision-making.
| Method | Best For | Tile Types Safe For | Relative Cost | Risk Level |
|---|---|---|---|---|
| Soap/Enzyme Cleaner | Oils, sunscreen, light film | All (glass, ceramic, vinyl, plaster) | Low | None |
| Vinegar (Acetic Acid) | Light calcium carbonate | Ceramic, porcelain, stone, glass | Low | Low |
| Commercial Scale Remover | Moderate carbonate scale | Most pool tiles (test spot first) | Moderate | Low–Moderate |
| Pumice Stone | Hard carbonate on durable tile | Unglazed ceramic, porcelain, stone only | Low | Moderate (scratching if misused) |
| Diluted Muriatic Acid | Severe carbonate scale | Ceramic, porcelain (grout risk) | Low | High (chemical burn, pH crash, etching) |
| Professional Bead Blasting | Heavy scale, silicate scale, full perimeter | All hard tiles (technician-dependent) | High ($500–$1,500) | Low (if performed by a professional) |
5. Prevention: Why Chemistry and Frequency Matter More Than Cleaning
Cleaning without prevention guarantees that the waterline ring will return within weeks. The root causes are evaporation-driven mineral deposition and the accumulation of organic oils.
Water Chemistry Targets
Maintaining these parameters does not prevent evaporation deposits entirely, but it significantly slows the rate at which they harden and become visible.
Operational Habits That Reduce Buildup
Weekly brushing is the single most effective preventive action. A 60-second pass with a nylon brush along the waterline during routine pool maintenance disrupts the sticky matrix of oils and loose minerals before they harden into carbonate crust . For pools with heavy bather load or year-round use, this should be done twice weekly.
Skim daily and use a skimmer sock. Surface oils are the adhesive that binds minerals and algae to the tile. A tennis ball or purpose-made oil-absorbing sponge floating in the skimmer basket captures sunscreen and body oils before they deposit on the waterline .
Shower before swimming. This is not merely a courtesy to other swimmers; it removes the surface oils and lotions that are the primary food source for waterline biofilm and the tacky layer that captures calcium crystals .
Consider a tile sealant. Nano-formulated multi-surface protectants (such as those marketed for pool calcium blocking) create a sacrificial, invisible barrier that fills the microscopic pores of grout and tile glaze. These products do not stop evaporation deposits, but they make future cleaning significantly easier and can be reapplied every 3–6 months .
6. Frequently Asked Questions
FAQ 1: Can I use a pressure washer to clean my pool tile above the water line?
Answer: Only with extreme caution, and generally not recommended for most residential pools. High-pressure washing can blast away deteriorating grout, force water behind the tile substrate (causing efflorescence and adhesive failure), and etch soft or glazed tile surfaces. If you must use a pressure washer, restrict it to the lowest effective pressure setting, hold the nozzle at a wide angle (not perpendicular), and keep it moving constantly. Never use a pressure washer on glass tile, older grout, or any tile where the grout is already cracking or missing . For almost all homeowners, a nylon brush and the appropriate chemical cleaner are safer and nearly as effective for the waterline band.
FAQ 2: Why does the white crust come back so quickly after I clean it?
Answer: The recurrence is driven by evaporation physics, not solely by a chemical imbalance. Every time water wicks up the porous grout and tile face and then evaporates, it leaves behind dissolved solids. If your pool has high calcium hardness, high total dissolved solids (TDS), or a high evaporation rate (hot, dry, or windy climate), the residue accumulates faster . Cleaning removes the visible deposit, but the mechanism that created it remains. To slow recurrence: keep pH at the lower end of the range (7.4–7.6), maintain calcium hardness at the lower half of the acceptable range (200–300 ppm if your surface allows), brush the waterline weekly to disrupt early deposits before they crystallize, and consider reducing water level fluctuations that repeatedly wet and dry the tile . Some pools—particularly those with spillover spas or negative-edge features—will always require more frequent attention because the constant wetting and drying cycle accelerates evaporite formation .
FAQ 3: Is it safe to use household bleach or vinegar on colored or glass pool tile?
Answer: Vinegar is generally safe for most glass and glazed ceramic tile when used diluted and rinsed promptly, but you should always test a small inconspicuous area first. Acetic acid can dull some metallic glazes and may etch natural stone. Household bleach (sodium hypochlorite) is not recommended as a standalone tile cleaner for the waterline. While it will kill algae and oxidize some organics, it does not dissolve calcium scale, and it leaves behind salt residue that contributes to the evaporite problem. Bleach can also react unpredictably with other cleaning chemicals (especially acids) to produce toxic chlorine gas . For glass tile specifically, avoid all abrasive methods (pumice, scrubbing pads with grit) and avoid muriatic acid entirely; use only soft cloths, mild soap, or a dedicated glass-safe pool tile cleaner. If you are uncertain about your tile’s composition or glaze, consult the manufacturer or a pool professional before applying any acid or abrasive .