How to Clean Clogged Perforated Leather Seats: A Technical Guide
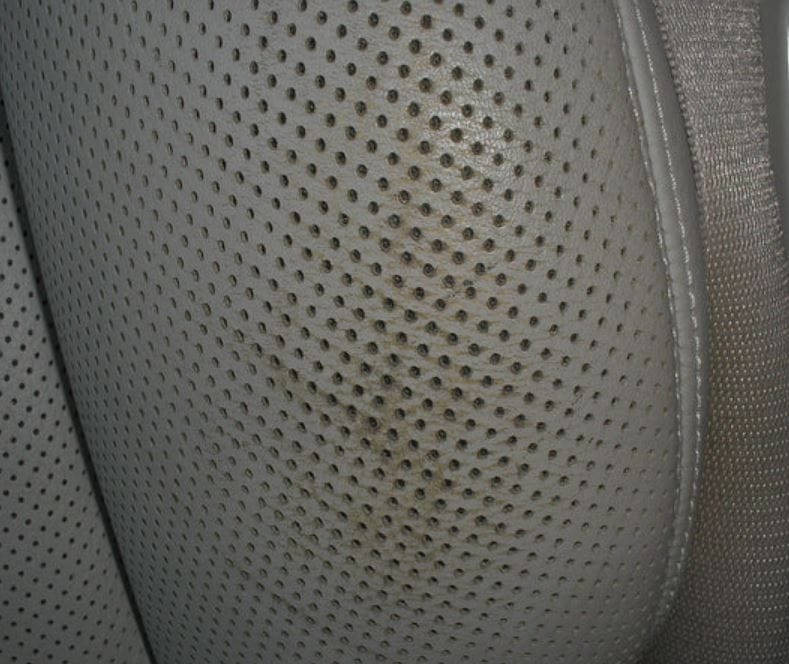
Perforated leather seats offer premium breathability and aesthetic appeal, but they are notoriously vulnerable to clogging. Over time, body oils, lotions, dust, food residues, and automotive conditioners can accumulate inside the tiny holes, creating unsightly white or dark spots that are resistant to standard wiping.
When a microfiber cloth fails to restore the seat’s appearance, the perforations are likely clogged at depth. Below is a professional, step-by-step methodology for restoring your perforated leather without damaging the material.
Step 1: Differential Diagnosis – Surface Film vs. Deep Clog
Before aggressive cleaning, determine the nature of the clog. Use a bright LED light (phone flashlight works) at a 45-degree angle.
| Feature | Surface Film | Deep Clog |
|---|---|---|
| Appearance | Uniform haze or shine | Distinct dots or filled holes |
| Texture | Slightly sticky | Rough, pitted, or crusty |
| Response to dry wipe | Improves temporarily | No change |
| Primary cause | Conditioner buildup, sweat | Lotions, food, abrasion from dark jeans |
Professional note: Deep clogs require fluid displacement or mechanical extraction. Avoid abrasive brushes at this stage.
Step 2: Required Tools & Material Rationale
Do not use general-purpose leather wipes. They deposit waxes and silicones that accelerate re-clogging. Use the following:
| Tool | Purpose | Substitute (if needed) |
|---|---|---|
| Soft nylon detailing brush (boar’s hair or soft toothbrush) | Agitate debris without tearing leather | Children’s soft toothbrush |
| Compressed air (canned) | Blow loose particles from holes | Tire inflator with fine nozzle (low PSI) |
| Leather-safe foam cleaner (pH 4.5–5.5) | Dissolve oils without soaking foam | Diluted isopropyl alcohol (10% solution) |
| Microfiber towel (nap-free) | Absorb dissolved residue | Lint-free shop towel |
| Vacuum with crevice tool + brush attachment | Extract loosened particles | – |
| Steamer (optional) | Vaporize deep organic clogs | Handheld garment steamer |
Step 3: The Extraction Protocol
Follow these phases sequentially. Do not skip the dry phase.
Phase 1: Dry Dislodging (5 minutes)
- Vacuum the seat surface using the brush attachment to remove surface dust and crumbs.
- Hold compressed air 2 inches from the leather at a 30° angle. Blast air across the perforations, not directly into them. Observe debris lifting.
- Re-vacuum immediately.
Phase 2: Chemical Softening (10 minutes)
- Apply leather foam cleaner sparingly to the soft brush, not directly to the seat (prevents oversaturation).
- Work the foam into the perforations using circular, non-pressure motions for 60 seconds.
- Allow dwell time: 3–5 minutes. The foam will lift hydrophobic clogs.
Phase 3: Mechanical Agitation (Critical)
- Using the nylon brush, make short stippling motions (vertical tapping directly into holes). Avoid lateral scrubbing which pushes debris deeper.
- For stubborn clogs: Wrap the brush head in a damp microfiber towel and repeat stippling. The towel’s texture will extract softened paste.
Phase 4: Extraction & Drying
- Wipe the area with a dry, clean microfiber towel.
- Use the vacuum’s crevice tool set to maximum suction. Run it slowly over the perforated zone.
- If a steamer is available: Apply brief steam bursts (1 second per zone) while vacuuming simultaneously. The heat expands the leather pores and loosens hydrates debris.
Step 4: Comparison of Common Cleaning Methods (Tested)
| Method | Efficacy on Deep Clogs | Risk of Damage | Best Use Case |
|---|---|---|---|
| Leather wipes only | None (smears only) | Low | Daily maintenance |
| Toothpick picking | Moderate | High (tearing) | Single large clog only |
| Foam + soft brush + vacuum | High | Very Low | Standard home cleaning |
| Steam + microfiber extraction | Very High | Medium (heat sensitivity) | Old, hardened clogs |
| Pressure washer (not recommended) | Not applicable | Severe | Never use |
Step 5: Preventing Recurrence (Professional Regimen)
Clogged perforations are largely preventable. Adjust your maintenance protocol:
| Action | Frequency | Reasoning |
|---|---|---|
| Vacuum perforated zones | Weekly | Removes dry particles before they absorb moisture |
| Use water-based leather sealant (not oil-based) | Every 3 months | Oil-based conditioners migrate into holes and attract dust |
| Avoid body lotions before driving | Immediate | Lanolin and aloe vera are the #1 clogging agents |
| Blow out holes with compressed air | Monthly | Prevents deep compaction |
| Install breathable seat covers for high-sweat use | Seasonal | Reduces salt and urea crystallization inside pores |
When to Call a Professional
If after two cleaning cycles the perforations remain visibly blocked or the leather becomes hardened or cracked, discontinue home methods. Seek an automotive detailer specializing in leather deep extraction (not steam-only services). They will use an ultrasonic cleaning rod or a leather-safe extraction machine (e.g., Dupray or Mytee) that irrigates and vacuums simultaneously.
Final Verdict
Cleaning clogged perforated leather seats requires dry agitation, targeted chemical softening, and vacuum extraction—in that order. The single most common mistake is applying excess liquid, which drives contaminants deeper into the seat foam. Adhere to the table below as a quick-reference checklist.
Quick-Reference Checklist
- Bright light inspection
- Dry vacuum + compressed air
- pH-neutral foam on brush only
- Stippling motion (not scrubbing)
- Wet microfiber extraction
- Final vacuum crevice tool
- Air dry 1 hour (no heat gun)
By following this technical approach, your perforated leather will regain its original matte finish and ventilation function without premature wear or cracking.