The Detailer’s Guide: How to Remove White Wax Residue from Black Plastic Trim
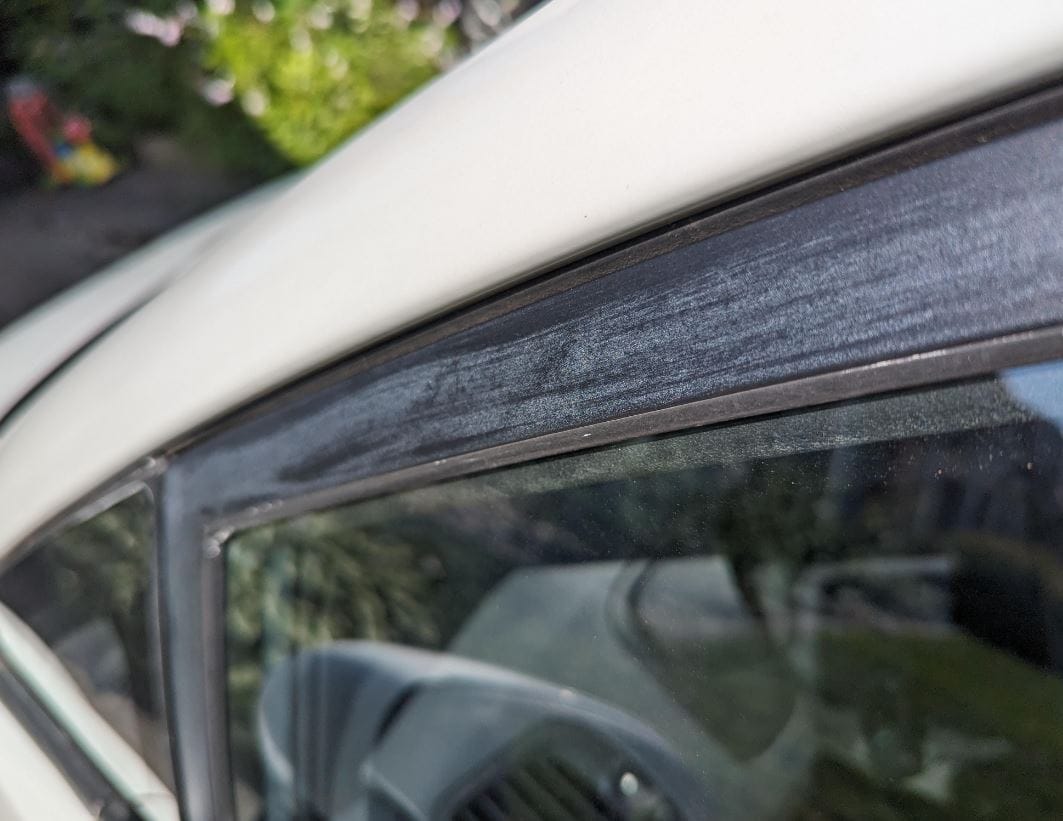
There are few things more frustrating in car detailing than finishing a flawless wax job, only to step back and see chalky, white stains splattered across your black plastic trim. This phenomenon, often referred to as “wax bloom” or “wax staining,” instantly downgrades the appearance of a vehicle, making bumpers, mirror housings, and cowlings look old and neglected.
The contrast between deep, glossy paint and stained trim is stark. However, the solution is not to apply more wax. This detailed guide explains the chemistry behind the stain, the tools you need, and a tiered, scientific approach to restoration.
The Science of the Stain: Why Wax Sticks to Plastic
To remove the residue, you must first understand why it clings so aggressively. Automotive plastics, particularly unpainted textured Polypropylene (PP) and Acrylonitrile Butadiene Styrene (ABS), are not solid surfaces at a microscopic level. They are porous, sponge-like structures riddled with peaks and valleys designed for mold release during manufacturing.
When you apply a carnauba or synthetic sealant paste, three things happen:
- Mechanical Interlocking: The wax solidifies within the microscopic pores and grooves of the grain texture.
- Solvent Penetration: The petroleum distillates in the wax carrier system briefly swell the plastic, opening pores and allowing the chalky filler agents (often kaolin clay or calcium carbonate) to embed themselves.
- Static Adhesion: Dry buffing creates static electricity, causing dry wax particles to cling aggressively to non-conductive plastic surfaces.
Because traditional soap and water cannot dissolve cured wax crystals (which are specifically engineered to repel water), a specialized removal methodology is required.
The Methodology Matrix: Choosing Your Weapon
Not all stains are created equal. A fresh smudge from this morning’s detail is vastly different from a months-old, UV-baked stain. The table below categorizes the solutions by aggression and application.
| Method | Aggression Level | Best For | Mechanism of Action | Risk Factor |
|---|---|---|---|---|
| Eraser Block | Low | Fresh, surface-level dust | Mechanical abrasion (micro-sanding) that shears wax peaks off without damaging the substrate. | Very Low |
| Peanut Butter / Natural Oils | Low | Light, fresh haze | Emulsification. The peanut oil (or mineral oil) seeps into the pores, re-liquefying the wax’s solvent carrier and suspending the solids. | Low (messy) |
| Citrus-Based Cleaner | Medium | Moderate, slightly aged | D-Limonene (citrus terpene) is a powerful solvent that breaks the molecular bond of hydrocarbon waxes without attacking cured plastic. | Low-Medium |
| Isopropyl Alcohol (70%) | Medium-High | Set-in white haze | Rapid evaporation causes thermal shock to the wax crystal, while the alcohol acts as a degreaser to dissolve the binder. | High (drying) |
| Dedicated Wax Remover | High | Stubborn, baked-in stains | Engineered proprietary solvents that reverse the cross-linking of synthetic sealants. | Low (designed for it) |
| Micro-Abrasive Compound | Very High | Permanent, oxidized damage | Physical removal of the top micron of oxidized plastic via micro-abrasives. | Very High (gloss change) |
Step-by-Step Restoration Protocol
Before you begin, understand the golden rule: Start with the least aggressive method first. You cannot put plastic back on once you’ve scrubbed it off.
Phase 1: The Mechanical Dry Erase (The Magic Eraser Technique)
The most overlooked tool for fresh mistakes is a high-density dry eraser block (commonly melamine foam).
- Ensure the trim is completely dry.
- Gently rub the foam block across the white residue using zero pressure. Do not add water.
- The foam acts like ultra-fine sandpaper, pulverizing the wax on the surface peaks without scrubbing it deeper into the pores.
- Use a soft detailing brush to flick the resulting dust away. Do not wipe with a cloth, which can push the powder back into the grain.
Phase 2: The Chemical Emulsification (Oil vs. Wax)
If the residue is past the “dust” stage, you need an emulsifier. The popular “peanut butter hack” works on the principle of “like dissolves like”—the oils break down the wax carrier system.
- The Professional Alternative: Avoid the sugar and preservatives in food-grade peanut butter. Instead, use straight mineral oil or raw linseed oil.
- Apply a small amount to a soft-bristled toothbrush.
- Agitate gently in a circular motion. The white stain will begin to turn translucent as the wax re-liquefies.
- Wipe away immediately with a clean microfiber towel before the solution re-cures.
- Follow up with an all-purpose cleaner to strip the oil residue, preventing a greasy finish that attracts dust.
Phase 3: The Solvent Flash (Alcohol Treatment)
For residue that has survived a wash or two, a polar solvent is required to break the ionic bond without damaging the plastic. 70% Isopropyl Alcohol (IPA) is the standard; 99% is often too harsh and flashes off too quickly to dissolve the wax.
- Dilute 70% IPA with distilled water at a 1:1 ratio.
- Soak a cotton swab or a soft detailing brush, never spray directly onto the trim (to avoid run-off onto fresh paint).
- Agitate the stain. You will see white transfer onto the brush/cotton.
- Critical Step: You must re-moisturize the plastic within 30 seconds. IPA strips plasticizers from the surface, leaving it brittle and gray. Wipe clean and immediately apply a water-based plastic dressing.
Phase 4: The Dedicated Eraser
If home remedies fail, commercial “wax and grease removers” (often marketed as panel wipe or silicone removers) are the next line of defense. These are high-flash naphtha blends designed to evaporate slower than alcohol, maximizing dwell time.
- Application: Wipe on, let dwell for 15-20 seconds, wipe off. The white residue should transfer onto your towel. Repeat 3-4 times for thick deposits.
Product Comparison: Commercial Removers vs. Home Remedies
To help you decide what to buy or reach for, here is a head-to-head comparison of common solutions based on efficacy and safety for black plastic.
| Product / Solution | Chemical Base | Dwell Time Required | Residue Left Behind | Plastic Safety Rating (1-5)* |
|---|---|---|---|---|
| Mother’s Back-to-Black Heavy Duty Trim Cleaner | Proprietary Surfactants | 30 seconds | Clean, matte finish | 5 |
| CarPro Eraser | Alcohol/IPA Blend | Instant | Zero, ready for coating | 4 |
| Gtechniq W7 Tar & Glue Remover | Citrus/Aliphatic Hydrocarbons | 1-3 minutes | Slight oily film | 5 |
| Peanut Butter (Creamy) | Peanut Oil / Sugar Granules | 1-2 minutes | Heavy grease, sticky residue | 3 (mess hazard) |
| WD-40 | Aliphatic Hydrocarbon / Petroleum Oil | 30 seconds | Oily gloss, strong odor | 4 (effective but stains paint) |
| Toothpaste (Whitening) | Hydrated Silica / Titanium Dioxide | Immediate | White dust, micro-scratches | 1 (Avoid) |
*Plastic Safety Rating: 5 = Safe, restores factory finish. 1 = High risk of staining, glossing, or physical abrasion.
The “Graying” Dilemma: When It’s Not Just Wax
If you have scrubbed the area with alcohol and the white is gone, but the plastic still looks dull and “grayish,” you have encountered a different problem: solvent bloom and oxidation.
The solvents in the wax leached the plasticizers out of the trim, causing the surface molecules to oxidize and turn white structurally. No amount of scrubbing will remove this because the white is the plastic now.
- The Fix: You must physically remove the oxidized layer with a fine-grade abrasive pad, or chemically mask it.
- The Cure: A high-quality ceramic trim coating or a heat-gun treatment (restoring the oils via controlled thermal expansion) is required, followed by a UV-stable dressing like Cerakote Trim Coat or Solution Finish.
Preventing the White Haze: A Detailer’s Secret
Remediation is difficult, but prevention is simple. The professional detailing industry has largely moved away from heavy paste waxes near plastic for this exact reason.
- Masking is Mandatory: Use 3M blue painter’s tape to mask off textured trim before applying any wax or sealant. The 10 minutes it takes to tape is vastly cheaper than the hour it takes to scrub.
- Use “Trim-Safe” Sealants: Modern spray ceramics and synthetic sealants (like Turtle Wax Hybrid Solutions or Meguiar’s Hybrid Ceramic Wax) are formulated to not stain plastic. In fact, many can be applied to black plastic to enhance gloss without the chalky side effect.
- The Petroleum Jelly Barrier: If you refuse to tape, apply a thin coat of Vaseline to the trim before waxing the paint. If wax gets on it, a wipe-down removes the Vaseline and the wax simultaneously.
Conclusion
White wax residue on black plastic is a chemical bond, not just a surface stain. The textured, porous nature of trim acts as a microscopic claw, holding onto dried polymers. By using the mechanical dry-erase method for fresh dust, or a controlled emulsification (mineral oil/citrus) for deeper stains, you can dissolve the wax without sacrificing the integrity of the plastic. Remember, the final step is always to recondition the trim with a UV-protectant, sealing the newly cleaned pores and ensuring that deep, rich black finish lasts longer than the wax on your paint.