How to Clean a Duster: A Complete Guide

Dusters are essential tools for keeping our homes free from dust, dirt, and allergens. However, if not cleaned regularly, they can become less effective and even spread more dust around. Whether you use a microfiber duster, a feather duster, or a lambswool duster, proper cleaning ensures it stays hygienic and efficient.
In this guide, we’ll walk you through the best methods to clean different types of dusters, along with tips to maintain their longevity.
Why Should You Clean Your Duster?
Before diving into the cleaning process, let’s understand why it’s important:
- Removes trapped dust and allergens – A dirty duster redistributes dust instead of trapping it.
- Prevents bacteria buildup – Dust can harbor germs and mold over time.
- Extends the duster’s lifespan – Proper care keeps it effective for longer.
- Improves cleaning efficiency – A clean duster picks up dust better.
Now, let’s explore how to clean different types of dusters.
How to Clean Different Types of Dusters
1. Cleaning a Microfiber Duster
Microfiber dusters are popular because they attract dust electrostatically. Here’s how to clean them:
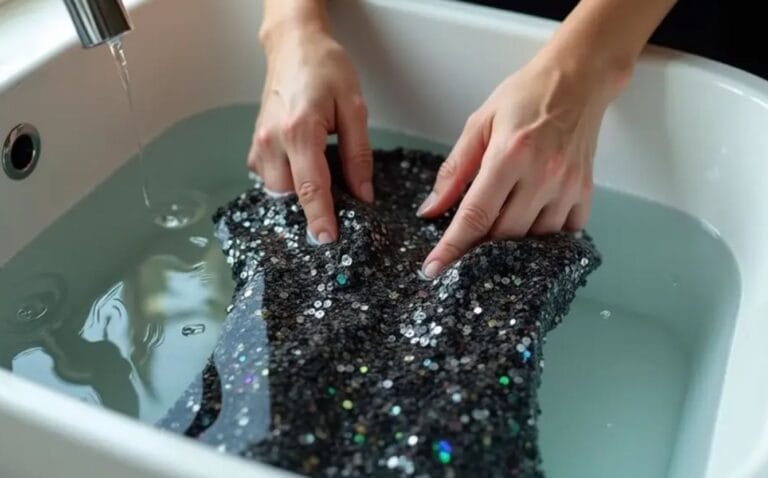
Hand-Washing Method
- Step 1: Shake off excess dust outdoors or over a trash can.
- Step 2: Fill a basin with warm water and add a small amount of mild detergent.
- Step 3: Soak the duster for 10-15 minutes, then gently agitate it to loosen dirt.
- Step 4: Rinse thoroughly with clean water until no soap residue remains.
- Step 5: Air-dry completely before reuse (avoid direct sunlight, as it can damage fibers).
Machine-Washing Method
- Step 1: Shake off loose dust.
- Step 2: Place the duster in a mesh laundry bag to protect the fibers.
- Step 3: Wash in cold water on a gentle cycle with mild detergent.
- Step 4: Avoid fabric softeners, as they reduce microfiber’s static charge.
- Step 5: Air-dry or tumble dry on low heat.
2. Cleaning a Feather Duster
Feather dusters require gentle handling to maintain their delicate fibers.
Dry Cleaning Method (Best for Light Dust)
- Step 1: Take the duster outside and shake it vigorously to remove dust.
- Step 2: Use a vacuum cleaner with a brush attachment to suck away embedded dust.
- Step 3: For stubborn dirt, lightly brush the feathers with a soft-bristle brush.
Wet Cleaning Method (For Deep Cleaning)
- Step 1: Fill a bowl with lukewarm water and a few drops of mild soap.
- Step 2: Swirl the feathers gently—do not scrub or twist.
- Step 3: Rinse under running water until clean.
- Step 4: Shake off excess water and let it air-dry in a well-ventilated area (avoid heat).
3. Cleaning a Lambswool Duster
Lambswool dusters are durable but require special care to maintain their softness.
- Step 1: Shake out loose dust outdoors.
- Step 2: Soak in lukewarm water with wool-safe detergent for 10 minutes.
- Step 3: Gently squeeze (do not wring) to remove dirt.
- Step 4: Rinse thoroughly and press out excess water with a towel.
- Step 5: Lay flat to dry to maintain its shape.
4. Cleaning an Extendable or Static Duster
For dusters with handles or static-charged heads:
- Step 1: Remove the head if detachable.
- Step 2: Wash according to material (microfiber or feather methods above).
- Step 3: Wipe the handle with a damp cloth and dry thoroughly.
- Step 4: Reattach only when completely dry.
Tips to Keep Your Duster in Top Condition
- Shake after each use – Prevents dust buildup.
- Store properly – Hang feather dusters upside-down to maintain shape.
- Avoid harsh chemicals – They can damage fibers.
- Replace when worn out – If fibers are frayed or shedding, it’s time for a new one.
Final Thoughts
Cleaning your duster regularly not only improves its performance but also ensures a healthier home. By following these simple steps based on your duster type, you’ll keep it fresh and effective for longer.
Got any duster cleaning hacks? Share them in the comments below!