How to Clean Elk Ivories: A Professional’s Guide to Preservation and Care
Meta Description: Learn the authoritative, step-by-step process for cleaning elk ivories (whistlers). From initial degreasing to final polishing, discover professional techniques to prevent cracking and ensure long-term luster.
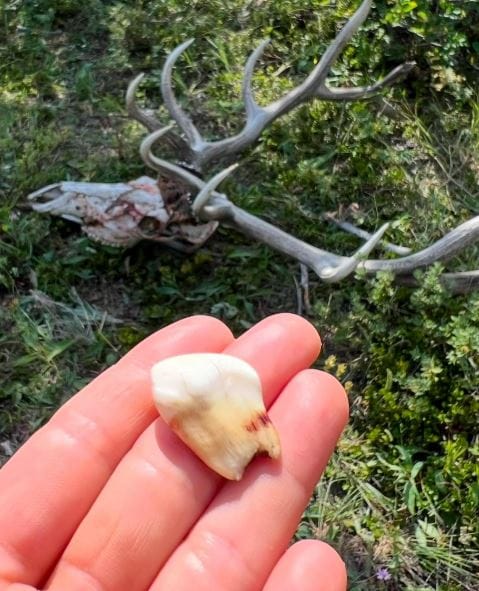
Introduction: What Are Elk Ivories?
Elk ivories—also known as “whistlers,” “buglers,” or “elk teeth”—are the vestigial canine teeth of North American elk (Cervus canadensis). Unlike true ivory from elephants or walruses, elk ivories are composed of dentine and enamel with a unique, organic core. They are prized by hunters, taxidermists, and jewelry makers for their historical use in ceremonial adornments and modern keepsakes.
Why proper cleaning matters: Improper cleaning leads to cracking (checking), dulling, and structural decay. This guide uses industry-accepted methods from wildlife taxidermy and gemology.
Phase 1: Initial Extraction & Field Care
Before cleaning begins, correct field handling prevents permanent damage.
| Action | Do This | Avoid This |
|---|---|---|
| Extraction | After caping the skull, use a small scalpel or bone saw to cut around the tooth socket. | Do not pry or twist with pliers—cracks radiate from the root. |
| Cleaning fluid | Rinse briefly in cool, clean water. | Never use hot water or bleach—this degrades collagen bonds. |
| Storage | Wrap in a damp paper towel and refrigerate (not freeze) for ≤48 hours. | Do not dry in direct sunlight or leave in a hot vehicle. |
Professional tip: Leave the root sheath intact until you return home. It buffers against humidity shock.
Phase 2: Degreasing – The Most Critical Step
Elk ivories contain bone marrow and organic fats. Over time, these fats oxidize, causing yellow-brown stains and a “greasy” feel. Degreasing is non-negotiable for long-term stability.
Step-by-Step Degreasing Protocol
- Remove the root sheath using fine-tipped forceps. Discard soft tissue.
- Soak in room-temperature ammonia-free degreaser (e.g., simple green 1:10 with distilled water) for 24 hours.
- Change solution daily – test by feeling the surface for slipperiness. Repeat until the water stays clear and the tooth feels dry to the touch (typically 3–7 days).
- Final rinse under running distilled water for 5 minutes.
| Degreasing Agent | Effectiveness | Risk Factor | Best For |
|---|---|---|---|
| 3% Hydrogen peroxide (short soak) | Medium | Low – but can whiten unevenly | Lightly stained ivories |
| Acetone | High | High – flammable, dries organic matrix | Professionally stabilized specimens |
| Simple Green (1:10) | High | Very Low | Home use – recommended |
| Household dish soap | Low | Low | Initial rinse only – not for deep degreasing |
Warning: Never use boiling water, sodium hydroxide (lye), or chlorine bleach. These will dissolve the dentine tubules and cause irreversible chalkiness.
Phase 3: Whitening & Stain Removal (Optional)
If a uniform white color is desired (e.g., for jewelry), proceed with caution. Natural elk ivories range from cream to pale tan. Over-whitening weakens the tooth.
Safe method:
- Mix 3% hydrogen peroxide with distilled water (1:1 ratio).
- Submerge ivories for 2–4 hours, checking every hour.
- Rinse thoroughly and rehydrate (see Phase 4).
Unsafe methods to avoid:
- Sun bleaching (causes UV degradation and cracks)
- Chlorine-based whiteners (brittle fractures)
- Abrasive toothpaste or baking soda (scratches surface)
Phase 4: Drying & Stabilization
Rapid drying causes internal stress cracks (“checking”). Professional conservators use a controlled, slow-drying protocol.
- Day 1–3: Place ivories in a sealed container with 85% humidity (e.g., a damp sponge at the bottom, not touching the teeth).
- Day 4–7: Reduce humidity to 50% – move to a container with dry silica gel packets.
- Day 8–14: Air dry in a cool (65–70°F), dark cabinet.
Test for dryness: Weigh the tooth daily. When weight stabilizes for 48 hours, drying is complete.
Phase 5: Polishing & Final Finish
Once fully dry and degreased, you can polish without trapping oils beneath the surface.
| Polish Type | Method | Finish Quality | Re-application Needed |
|---|---|---|---|
| Microcrystalline wax (e.g., Renaissance Wax) | Apply thin coat, buff with soft cotton | High – satin to gloss | Every 1–2 years |
| Carnauba wax | Melt and apply sparingly, buff | Medium – warm luster | Every 6 months |
| Mineral oil (very light) | Finger-apply, wipe excess | Low – temporary shine | Monthly (not recommended) |
| Jewelry tumbler with walnut shell media | Professional equipment | Excellent – high gloss | Never, but removes patina permanently |
Recommended home method:
- Hand-polish with a clean microfiber cloth.
- Apply Renaissance Wax using a soft brush.
- Buff after 10 minutes.
Professional note: Do not use rotary tools (Dremel) with felt wheels – localized heat will craze the surface.
Comparison: Elk Ivory vs. Elephant Ivory Cleaning
| Aspect | Elk Ivory | Elephant Ivory |
|---|---|---|
| Core composition | Dentine + enamel + organic root | Dentine only (no enamel) |
| Sensitivity to solvents | High – prone to cracking | Moderate |
| Degreasing need | Essential – high marrow content | Rarely needed |
| Permitted whitening | Very mild peroxide | Oxygen-based bleaches only |
| Long-term stability | Requires humidity control | More stable |
Final Checklist: Do’s and Don’ts
✔ Do:
- Use distilled water for all rinses.
- Store finished ivories in a fabric-lined box at 40–50% humidity.
- Reapply wax annually.
✘ Don’t:
- Soak in water for more than 48 hours (promotes bacterial growth).
- Wear elk ivories against bare skin for long periods (skin oils re-stain).
- Use ultrasonic cleaners – vibrations cause micro-fractures.
When to Call a Professional Conservator
Seek expert help if you notice:
- Existing hairline cracks
- Flaking or powdery surface (dry rot)
- Dark, sticky ooze (advanced fat oxidation)
A professional wildlife taxidermist or museum conservator can perform vacuum degreasing and epoxy stabilization.
Conclusion
Cleaning elk ivories correctly balances thorough degreasing, controlled drying, and gentle polishing. Rushing any step invites permanent damage. By following this professional protocol, your elk ivories will retain their natural beauty and structural integrity for generations.