The Definitive Guide to Removing Rust from Your Garage Door
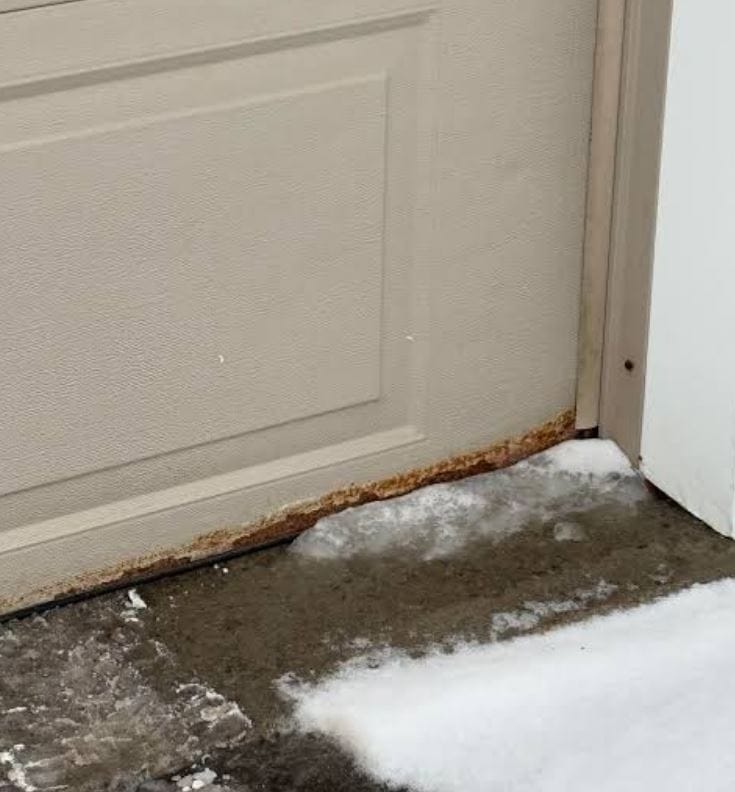
Rust is the natural enemy of steel garage doors. What begins as a cosmetic blemish can rapidly evolve into structural decay, leading to costly panel replacements. Because garage doors act as the single largest moving object in a home, maintaining their integrity is critical not just for aesthetics, but for mechanical functionality.
This guide details a professional-grade methodology for rust removal, ranging from light surface contamination to deep, penetrating oxidation.
1. The Chemistry of the Problem: Why Garage Doors Rust
Before selecting a removal method, you must identify the substrate. The approach for a 24-gauge steel door differs significantly from an aluminum door.
| Door Material | Corrosion Type | Visual Indicator | Aggressiveness Level |
|---|---|---|---|
| Steel | Red Iron Oxide (Fe₂O₃) | Flaking, bubbling paint, reddish-brown stains. | Highly aggressive; flakes and expands. |
| Aluminum | White Aluminum Oxide | Dull gray/white powdery film, pitting without color staining. | Self-limiting; stays localized but creates deep pits. |
| Fiberglass/Composite | Staining (Secondary) | Orange streaks running down from metal hinges/hardware. | Surface stain only; no structural digestion. |
Professional Insight: If a magnet sticks to your door, it is steel and requires immediate intervention. If the magnet doesn’t stick, it’s aluminum or fiberglass—do not use abrasive steel wool on aluminum, as particles will embed and create galvanic corrosion.
2. Triage: Assessing the Severity of Corrosion
Don’t reach for sandpaper immediately. Inspect the door under raking light (sunlight across the surface) to identify three distinct stages.
Stage 1: Surface Oxidation
- Symptom: A light “dusting” of color with zero texture change.
- Cause: Moisture sitting on intact factory paint.
- Solution: Chemical decontamination (Iron Remover).
Stage 2: Pitted Corrosion
- Symptom: Small, deep dots with hairline paint edges; visible bubbling.
- Cause: A stone chip or salt scratch has allowed moisture to penetrate the galvanized layer.
- Solution: Mechanical spot removal with acid conversion.
Stage 3: Rotted/Scaling Metal
- Symptom: Laminated layers of metal; knife can push through; holes present.
- Cause: Long-term neglect.
- Solution: Cut out and fill (Bondo/Epoxy), or full panel replacement. This guide focuses on Stages 1 & 2, which are restorable.
3. Toolkit and Safety Arsenal
A successful restoration requires strict adhesion protocols. The garage environment typically lacks ventilation; volatile organic compounds are a severe risk.
Safety Gear:
- Respirator: P100 particulate filters (sanding) + Organic Vapor cartridges (painting).
- Chemical Gloves: Nitrile (butyl rubber if using phosphoric acid).
- Eye Protection: Splash-proof goggles.
Mechanical Tools:
- Random Orbital Sander (5-inch) with 80–220 grit disks.
- Drill with wire wheel cup brush (for heavy scale only).
- Sanding sponges and blocks for contoured panels.
Chemical Inventory:
- Isopropyl Alcohol (70%+ ) or Wax & Grease Remover.
- Rust Converter (Tannic acid based) vs. Rust Remover (Phosphoric acid based).
- Self-Etching Primer (Zinc-based).
- Touch-up paint matched to manufacturer code.
4. Methodology: Step-by-Step Remediation
Phase A: The Neutral Wash
Before abrading, the door must be chemically stripped of road film, wax, and silicone contamination. Sanding over dirt grinds hydrocarbons into the metal pores, causing “fish eyes” in the new paint.
- Wash the entire door with a heavy-duty degreaser (pH 12+).
- Wipe down the repair area with Wax & Grease Remover and a clean microfiber cloth, moving in one direction only.
Phase B: Mechanical Abrasion (The “White Metal” Standard)
The goal is to physically remove the red rust until only shiny silver metal remains.
- For Stage 1 Rust: Use a maroon Scotch-Brite pad and a rust-cutting polish like Flitz. No sanding needed.
- For Stage 2 Rust: Use a spot sandblaster or an orbital sander with 120-grit. Do not use an angle grinder; the friction heat warps 24-gauge door skin instantly.
- The Pocket Screwdriver Test: Drag a flathead screwdriver across the spot. If it glides on silver metal without hitting a black pit, you’ve excavated the rust.
Phase C: Chemical Passivation (Critical Choice)
You have a fork in the road. Do you convert the microscopic rust left in the pores, or remove it entirely?
| Product Type | Active Ingredient | Mechanism | Best Use Case | Dry Time | Paint Window |
|---|---|---|---|---|---|
| Phosphoric Acid Remover | H₃PO₄ | Dissolves iron oxide and etches metal; leaves iron phosphate coating. | Smooth metal that requires welding or flawless painting. | 30-60 mins | Rinse with water, dry immediately, prime within 1 hour. |
| Tannic Acid Converter | Tannins | Reacts with iron oxide to form stable, blue-black ferric tannate. | Rough, pitted surfaces where you can’t reach bare metal. | 24 hours | Do not sand the black layer. Topcoat directly. |
Warning: Do not use rust converter under body filler (Bondo). The chemical reaction will prevent mechanical adhesion. Converters must be painted over, not filled over.
Phase D: Filling Pitted Scars
If the rust created a crater but you’ve removed it all, use a two-part polyester glazing putty.
- Mix putty with cream hardener (2% ratio).
- Apply thinly with a plastic squeegee. Polyester putty shrinks; multiple thin coats are superior to one thick “cheese” layer.
- Block sand with 220-grit until the surface is level and featheredged.
5. The Resurrection Protocol: Priming and Painting
Removing rust creates a “halo” of bare metal surrounded by intact paint. You cannot simply dab touch-up paint onto bare steel; it lacks adhesion and anti-corrosion properties.
Step 1: Self-Etching Primer
Use a high-zinc aerosol primer (SEM or Eastwood). The zinc sacrifices itself to prevent the steel from rusting again.
- Apply 2 light, dusty coats.
- Do not sand the primer; you will disrupt the zinc barrier film.
Step 2: Sealer/Epoxy Barrier
Apply a non-porous epoxy sealer to prevent moisture transmission.
Step 3: Color Matching
Garage door paint must handle UV and extreme temperature swings. Match the manufacturer’s code (often found on a sticker on the top panel or end stile).
- Use acrylic urethane or polyurethane enamel.
- Apply 3 thin coats, flashing off between applications.
6. Product Comparison Matrix
The market is flooded with “miracle” rust solutions. Below is a technical comparison of leading chemistries.
| Brand / Product | Chemistry | Application | Residue | Paint Compatibility | Longevity Rating |
|---|---|---|---|---|---|
| Evapo-Rust | Chelation (pH Neutral) | Immersion or soaked cloth (difficult on vertical panels). | Water-soluble residue; must be rinsed. | Excellent, leaves carbon-stable surface. | High (non-toxic, no etching). |
| Ospho | Phosphoric Acid (Green) | Brush on liquid; thin. | Sticky crystalline film if not rinsed. | High, but must be wiped with damp rag before drying. | Very High (industry standard for marine). |
| Corroseal | Gallic/Tannic Acid | Brush on milk-white liquid. | Turns black, hard, and glossy. | Direct topcoat without sanding. | Moderate (requires 100% saturation). |
| Rust-Oleum Rust Dissolver | Acid gel | Spray bottle/cling gel. | Sticky; requires mineral spirits wipe. | Good, if scuffed before painting. | Moderate (consumer grade). |
| WD-40 Specialist Rust Remover | Chelation + Solvent | Spray bottle (rapid evaporation). | Dries quickly; non-corrosive. | Requires thorough degreasing after use. | Low (best for light surface rust). |
7. Post-Repair Weatherproofing
Rust always recurs at the bottom panel first. This is a splash zone.
- Bottom Weatherstrip Integrity: Replace hardened, cracked astragals. Water must not pool against the metal.
- Drainage Angle: Ensure the concrete apron slopes 1/4-inch per foot away from the door opening.
- Sacrificial Anodes: For coastal environments, consider adhesive zinc anode packs attached to the inside of the bottom panel. These will corrode sacrificially before the steel does.
- Fluid Film / Woolwax: On the inside of the door bottom (unpainted but galvanized), mist a lanolin-based rust inhibitor annually.
8. The “Do Not Do” List
- No Sanding Dust into Tracks: Abrasive dust and grease create a destructive grinding compound on rollers. Tape plastic sheeting over the vertical tracks before starting.
- Never Bleach Clean: Chlorine accelerates oxidation on steel. Do not use household bleach to “clean” rust stains.
- Avoid Flash Rusting: Bare steel in a humid garage can develop orange haze (flash rust) within 15 minutes. The time between final sanding and priming must be minimized.
- Don’t Spot-Paint with Latex: House paint is water-based and will actually promote under-film corrosion on a steel entry door.
9. Conclusion: A Long-Term Strategy
Removing rust from a garage door is not an art project; it is a preservation protocol. The key differentiator between a 6-month touch-up and a 5-year repair lies in the passivation step—killing the invisible iron oxide in the metal’s pores.
By mechanically excavating the rust, chemically pacifying the surface, and sealing it with a zinc-rich barrier, you restore the door’s fatigue resistance and appearance. Properly executed, a restored section should outlast the original factory finish.
Note: If structural rust has expanded into the stile (the vertical support rail inside the panel), the panel has lost its wind-load rating. No amount of sanding will restore safety—consult a garage door professional for panel replacement.