Key Steps to Take After Water Damage Occurs in Your Home

Water on the carpet, dripping walls, and that unmistakable musty smell—suddenly your weekend plans change. You’re staring at a mess and wondering where to start, who to call, and what can wait. Relax; grab a notepad and breathe.
This guide walks you through practical, no-nonsense actions that protect your health, sanity, and belongings. If you’re in Melbourne, the water damage specialist resources can complement the steps outlined here today.
Ensure Immediate Safety
Moments after discovering a leak or flood, shift into safety mode. Electricity and water never mix, and structural surprises lurk beneath puddles and swollen floors.
- Kill the power at the main breaker if any outlets, cords, or appliances are damp, sparing everyone from shocks and sparking fires.
- Shut off the water at the nearest valve or the house main, stopping additional gallons from pouring into vulnerable rooms.
- Put on protection—rubber boots, gloves, and goggles keep contaminants off skin while you wade, lift, or assess.
- Scan for hazards such as sagging ceilings, loose drywall, and slippery surfaces before walking deeper into affected zones.
- Ventilate quickly by cracking windows and running fans in dry areas, reducing lingering vapors that can irritate lungs and eyes.
With immediate threats controlled, you can focus on assessment and preservation, knowing family members and pets remain clear of avoidable danger.
Document Damaged Areas
Once safe, pull out your phone and start chronicling everything. Detailed evidence supports insurance reimbursement and guides contractors toward accurate, efficient restoration solutions.
Capture Wide-Angle Overviews
Stand in each room’s corner and photograph full walls, ceilings, and floors to reveal water lines, discoloration, and buckling that isolated close-ups might miss entirely.
Zoom In On Materials
Snap close shots of soaked baseboards, delaminating cabinets, wet carpet pads, and warped hardwood so adjusters can calculate repair versus replacement correctly.
List Damaged Contents
Create a spreadsheet of furniture, electronics, and sentimental items. Include age, model, and estimated value; attach matching photos for streamlined claim approval.
File Insurance Claim Quickly
Procrastination costs money. Insurers expect prompt notice, and policy language often sets strict timelines for reporting water incidents and preventing secondary damage.
- Review your policy to confirm deductibles, exclusions, and filing deadlines before contacting the carrier, sidestepping surprises later.
- Call the claims line and obtain a reference number; jot down the representative’s name and promise date for the adjuster visit.
- Email evidence promptly—photos, videos, moisture logs, and temporary repair receipts—to establish transparency and accelerate payout.
- Hire mitigation pros who provide written estimates; insurers usually approve reasonable emergency work performed to curb additional loss.
- Maintain a conversation log capturing dates, decisions, and promised reimbursements, protecting you if paperwork stalls or memories fade.
By staying organized you convert a stressful process into a manageable checklist and receive funds in time to keep repairs on schedule.
Extract Standing Water
Speed matters because every passing hour invites swelling, warping, and microbial growth. Powerful extraction shortens overall drying time and reduces irreversible damage.
Choose The Right Equipment
Wet/dry vacuums handle shallow puddles; submersible pumps move inches-deep pools; truck-mounted extractors tackle whole-house flooding with professional efficiency.
Work From High To Low
Start in upstairs bathrooms or burst-pipe lofts, moving downward. Gravity continually feeds lower floors, so clearing upper levels first avoids reflooding efforts.
Strip Saturated Surfaces
Peel back soaked carpets, padding, and vinyl to expose subfloors for extraction. Hardwood planks may need surface vac heads between boards for trapped water.
Relocate Furniture And Valuables
Quickly rescuing possessions limits staining, swelling, and mold while giving restoration crews room to maneuver drying gear and demolition tools.
- Elevate wood legs on foil-wrapped blocks to stop moisture wicking and ugly black spotting that ruins finishes.
- Transfer electronics onto dry countertops; avoid powering devices until certified technicians inspect internal corrosion risks.
- Pack sentimental items such as photos, artwork, and heirloom fabrics into ventilated plastic bins headed for a climate-controlled spare room.
- Label every box with room name and contents, streamlining delivery back once repairs finish and chaos subsides.
- Consider professional pack-out services when large volumes or fragile antiques demand specialized inventory, cleaning, and secured storage.
Protecting belongings early not only safeguards memories but also reduces replacement costs that might otherwise strain insurance limits.
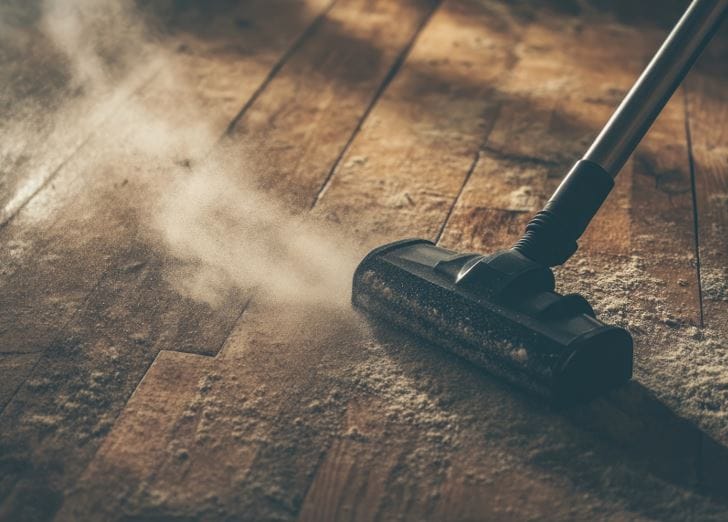
Accelerate Whole-House Drying
After extraction, success hinges on physics—evaporation, air movement, dehumidification, and temperature control. Balanced correctly, interior materials reach safe moisture levels in days instead of weeks.
Optimize Airflow
Stage centrifugal and axial air movers to create circular patterns across floors and up walls, stripping away humid boundary layers and boosting evaporation dramatically.
Deploy Dehumidifiers
Low-grain refrigerant or desiccant units pull moisture from air the blowers release. Empty reservoirs or route hoses to drains for continuous 24-hour operation.
Increase Heat Strategically
Raising ambient temperature five to ten degrees accelerates vapor release, yet always monitors relative humidity to prevent condensation on cold surfaces.
Inspect Hidden Moisture Pockets
Water loves secrecy, hiding behind paint, under cabinets, and inside insulation. Ignoring these spots risks lingering odors, rot, and costly repeat repairs down the road.
Use Infrared Cameras
Thermal imaging reveals cooler damp areas invisible to the naked eye, pinpointing where to open walls or focus dehumidifiers for faster results.
Probe Wall Cavities
Drill small test holes near baseboards and insert pin meters or insert hose inject-dry systems, verifying studs and insulation reach target dryness.
Map Flooring Layers
Moisture mapping mats detect trapped water under tile or hardwood. Targeted suction mats or panel vacs then extract without total demolition.
Check For Mold Growth
Mold can bloom within twenty-four hours, releasing spores that threaten health and stall reconstruction. Vigilant monitoring and prompt action keep colonies from taking hold.
- Perform a visual sweep for fuzzy spots, musty odors, or discoloration on drywall, furniture backs, and HVAC registers.
- Control humidity under 50 percent during drying, depriving spores of the moisture needed to germinate and spread.
- Isolate suspect areas with plastic sheeting and negative air machines when patches appear, preventing cross-contamination to clean rooms.
- Apply antimicrobials on damp surfaces after cleaning debris, forming a residual barrier against future outbreaks.
- Schedule testing if extensive growth is possible; certified inspectors can verify air quality before children or immune-compromised occupants return.
Early detection translates to simpler remediation, saving walls, budgets, and lungs from the consequences of uncontrolled fungal expansion.
Remove Unsalvageable Materials
Some components simply can’t be dried or disinfected effectively. Removing them speeds drying, eliminates contamination, and prepares the structure for a solid rebuild.
Identify Porous Losses
Waterlogged drywall, insulation, particleboard, and carpet pads act like sponges. Once saturated they harbor bacteria, so cut and bag them immediately.
Create Clean Cut Lines
Mark two feet above the highest water line and perform straight horizontal cuts. This “flood cut” removes damp sections while preserving reusable framing.
Dispose Responsibly
Local ordinances may require special handling for mold-contaminated debris. Coordinate dumpsters and follow guidelines to avoid fines and neighborhood complaints.
Begin Repairs And Restoration
With moisture gone and contamination controlled, the transformation phase starts. Skilled trades rebuild, refinish, and ultimately make the ordeal a distant memory.
- Confirm dryness through final moisture and air quality tests before sealing cavities, ensuring hidden dampness won’t resurface later.
- Coordinate trades—framers, electricians, plumbers, and drywallers—to streamline scheduling and minimize project downtime.
- Select resilient materials such as moisture-resistant drywall, vinyl plank flooring, and closed-cell insulation to lower future water-damage risk.
- Match finishes to existing décor, blending new paint, trim, and cabinetry seamlessly so repaired rooms feel cohesive rather than patched.
- Review warranties on contractor workmanship and installed products, giving peace of mind long after fans and dehumidifiers leave.
When the final coat of paint dries and furniture returns, your restored home proves that swift action, documentation, and professional help pay lasting dividends.
Lasting Recovery
Acting swiftly now saves you costly headaches later. Follow these steps, keep records, and verify every surface is truly completely dry. If carpets remain damp, engage expert carpet drying services rather than risking hidden mold. Finally, monitor your health and home over the coming weeks for any lingering warning signs.