How to Clean a Stone Shower Floor: A Professional’s Guide to Long-Lasting Results
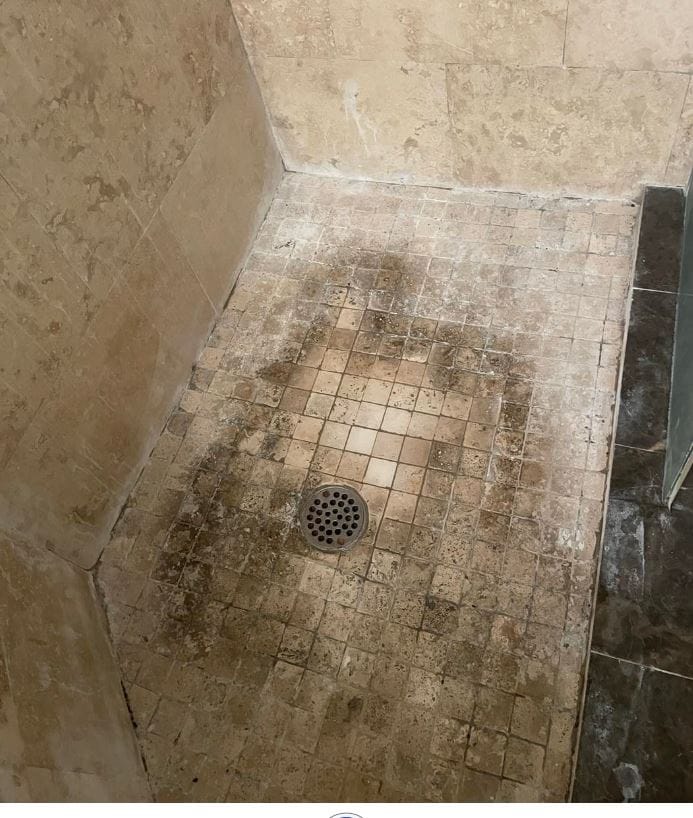
Natural stone shower floors—slate, marble, travertine, limestone, or granite—add spa-like luxury to any bathroom. However, their porous nature makes them vulnerable to soap scum, hard water stains, and mold. Unlike ceramic or porcelain, stone requires pH-neutral, non-abrasive care. Clean it incorrectly, and you risk etching, dulling, or discoloration.
This guide provides a step-by-step professional methodology, product comparisons, and preventive maintenance to keep your stone shower floor pristine for decades.
Why Stone Shower Floors Need Special Care
Stone is geologically formed under pressure, making it naturally porous. Acidic cleaners (vinegar, lemon, or bathroom-specific sprays) chemically react with calcium-based stones (marble, travertine, limestone), causing dull etching. Alkaline or abrasive cleaners scratch softer stones like slate. Therefore, only pH-neutral stone cleaners should be used.
Tools & Supplies You Will Need
- pH-neutral stone cleaner (e.g., MB-1, Black Diamond Stoneworks)
- Soft nylon brush or microfiber mop
- Non-abrasive sponge
- Squeegee
- Microfiber cloths (lint-free)
- Optional: Stone-safe sealer, poultice for stains
Step-by-Step Cleaning Protocol
Step 1: Dry Removal of Debris
Before any liquid touches the floor, remove loose hair, sand, and grit using a dry microfiber cloth or a soft-bristle dust mop. Abrasive particles act like sandpaper when wet.
Step 2: Apply pH-Neutral Cleaner
Dilute your stone cleaner according to label instructions (typically 4:1 water to cleaner). Spray or pour onto the floor, covering 3–4 sq ft at a time. Never use vinegar, bleach, ammonia, or any product labeled “bathroom cleaner” unless explicitly stone-safe.
Step 3: Agitate with a Soft Brush
Using a nylon brush (not steel or stiff plastic), gently scrub in circular motions, paying attention to grout lines and corners. Avoid excessive pressure.
Step 4: Rinse Thoroughly
Residue attracts dirt. Rinse with warm water using a clean sponge or a detachable shower head. Change rinse water frequently. Incomplete rinsing is the #1 cause of film buildup.
Step 5: Dry & Inspect
Immediately dry the floor with a clean microfiber cloth. Standing water leads to hard water deposits. Check for remaining stains or dullness.
Comparison Table: Cleaner Types for Stone Shower Floors
| Cleaner Type | Safe for All Stone? | Effective Against | Risk Level | Recommended Brand Example |
|---|---|---|---|---|
| pH-Neutral Stone Cleaner | Yes | Soap scum, daily soil | None – Ideal | MB-1, StoneTech Pro |
| Diluted Dish Soap (pH ~7-8) | Yes (rinse well) | Light grease, dirt | Low – Use sparingly | Seventh Generation Free & Clear |
| Vinegar / Acidic | No (marble, travertine) | Hard water | High – Causes etching | Never use |
| Bleach / Ammonia | No | Mold, mildew | High – Discolors stone | Never use |
| Hydrogen Peroxide (3%) | Only on light stone | Organic stains | Moderate – Spot test first | Generic pharmacy grade |
| Stone-Specific Sealer | N/A (preventive) | Stain resistance | None – Protective | Miracle Sealants 511 |
Dealing with Specific Problems
Hard Water Deposits (White, Chalky Rings)
- Cause: Calcium in water evaporating on stone.
- Solution: Do not use acid. Use a stone-safe hard water remover (e.g., Lithofin Cement Residue Remover) or a paste of baking soda and pH-neutral cleaner. Let sit, then gently scrub.
Soap Scum Buildup (Gray, Waxy Film)
- Cause: Body oils + soap reacting with minerals.
- Solution: Use a stone-safe soap scum remover. For DIY, mix 1 part rubbing alcohol with 3 parts distilled water and 2 drops of pH-neutral dish soap. Spray, dwell 2 minutes, scrub, rinse.
Mold or Mildew (Black or Pink Spots)
- Cause: Moisture in porous stone or grout.
- Solution: Mix 1:1 water and 3% hydrogen peroxide (spot test first). Apply, dwell 10 minutes, scrub, rinse thoroughly. Improve ventilation.
Preventive Maintenance Schedule
| Frequency | Action | Time Required |
|---|---|---|
| After every shower | Squeegee floor and walls | 30 seconds |
| Weekly | Clean with pH-neutral stone cleaner + soft brush | 5 minutes |
| Monthly | Inspect sealer effectiveness (water beading test) | 2 minutes |
| Every 6–12 months | Reapply penetrating stone sealer | 20 minutes |
How to Test & Reapply Sealer (Critical for Longevity)
- Water test: Sprinkle a few drops on the clean, dry stone floor. If water darkens the stone or soaks in within 5 minutes, resealing is due.
- Clean the floor thoroughly and allow to dry for 24 hours.
- Apply a penetrating impregnating sealer (not topical). Wipe away excess after 10 minutes.
- Cure for 12 hours before use.
What NOT to Do (Common SEO Myths Busted)
- Myth: “Vinegar is natural, so it’s safe for stone.”
Fact: Vinegar (acetic acid) chemically etches calcium-based stone permanently. - Myth: “Steam cleaners are safe for all stone.”
Fact: High heat and pressure can force moisture into micro-fissures, causing spalling (flaking). - Myth: “Baking soda scrubs are always safe.”
Fact: While mild, abrasive action can polish soft stone unevenly. Use as a paste, never dry.
Final Professional Recommendation
For a stone shower floor that retains its natural beauty and resists damage:
- Clean weekly using only pH-neutral stone cleaner.
- Squeegee after every use (this single habit reduces cleaning effort by 80%).
- Reseal bi-annually if used daily.
- Never use acidic, alkaline, or abrasive general bathroom cleaners.
Following this protocol will keep your stone shower floor looking newly installed, while preventing costly resurfacing or replacement.