How to Clean Car Speakers: A Professional Guide to Restoring Audio Fidelity
Automotive audio systems are subjected to extreme environmental stressors—dust, humidity, temperature swings, and airborne oils. Contrary to popular belief, cleaning car speakers is not the same as cleaning interior trim. Improper techniques can permanently damage delicate cones, foam surrounds, or tweeter diaphragms.
This guide provides a component-specific, damage-free methodology for cleaning car speakers, along with a comparison of cleaning agents and when to replace rather than clean.
Why Cleaning Car Speakers Matters
Degraded speaker performance is often misdiagnosed as electrical failure. In reality, accumulated particulate matter alters the moving mass of the cone and compromises the suspension (surround). Key consequences of dirty speakers include:
- Muffled highs (blocked tweeters)
- Distortion at moderate volume (uneven cone movement)
- Reduced bass response (clogged passive radiators or ports)
- Overheating (dust acting as thermal insulation on voice coils)
Professional note: Cleaning will not repair torn surrounds, dented dust caps, or seized voice coils. If you hear scratching or rubbing, stop—you may need reconing or replacement.
Tools Required
| Tool | Purpose | Substitution Allowed? |
|---|---|---|
| Soft-bristled detailing brush (1” and 2”) | Loosening surface dust | No (avoid toothbrushes—too stiff) |
| Microfiber towels (lint-free) | Lifting dislodged particles | Yes (camera lens cloth) |
| Compressed air (regulated to ≤30 PSI) | Blowing out grilles and crevices | Yes (canned air, held vertically) |
| Isopropyl alcohol (91% or higher) | Dissolving oily residues | No (avoid 70%—contains too much water) |
| Cotton swabs (precision tips) | Grille slot cleaning | No (loose cotton can snag) |
| Vacuum with brush attachment | Initial bulk debris removal | Yes (computer duster vacuum) |
Critical Warning: What Never to Use
| Product / Tool | Why It Is Dangerous |
|---|---|
| Armor All or interior dressings | Leaves non-conductive film on cones; alters frequency response |
| Pressure washer or steam cleaner | Guaranteed voice coil corrosion |
| Glass cleaner (ammonia-based) | Embrittles polypropylene and rubber surrounds |
| Paper towels or shop rags | Scratches delicate dome tweeters |
| Adhesive tape or lint rollers | Can tear foam or pull off dust caps |
Step-by-Step Cleaning Procedure
Phase 1: Preparation & Isolation
- Disconnect the negative battery terminal (prevents accidental short-circuit if grille removal requires tools).
- Remove speaker grilles per vehicle service manual. Most are pry-off clips or hidden screws.
- If grilles are fabric-covered, clean them separately (see comparison below).
Phase 2: Dry Debris Removal
| Step | Action | PSI / Force |
|---|---|---|
| 1 | Vacuum grille area with brush attachment | Low suction |
| 2 | Hold compressed air 8–10 inches from cone | 20–30 PSI |
| 3 | Angle air at 45° to blow dust outward, not into the gap | N/A |
Technique note: Always blow away from the center dust cap toward the surround. Blowing directly into the voice coil gap forces debris into the magnetic assembly, causing voice coil rub.
Phase 3: Wet Cleaning (Residue & Oils)
Only proceed if dry cleaning failed to remove smudges or sticky contaminants (e.g., spilled coffee, nicotine film).
- Dampen a microfiber towel with 91% isopropyl alcohol (do not saturate).
- Gently wipe the cone in one direction—no circular motions.
- For rubber surrounds: light wipe only. For foam surrounds: do not wet clean (foam disintegrates on contact with alcohol).
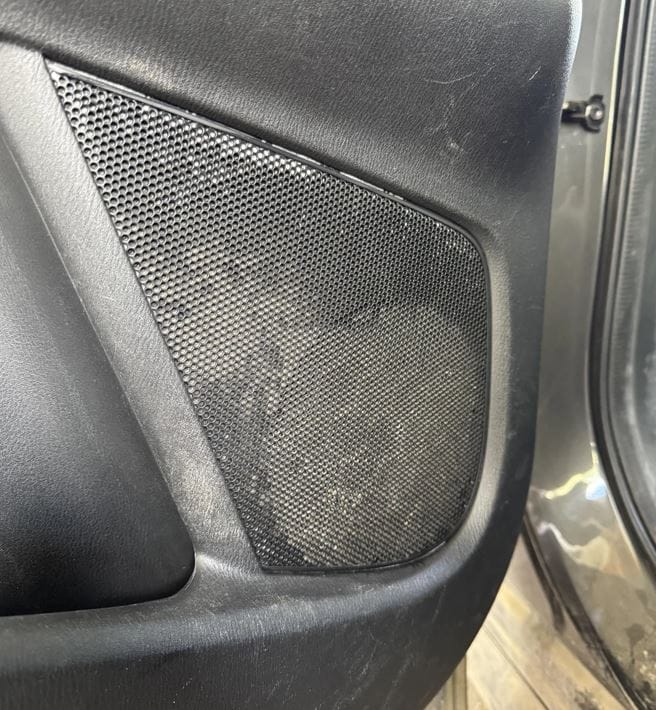
Phase 4: Tweeter & Grille Detailing
| Component | Cleaning Method | Max Pressure / Moisture |
|---|---|---|
| Dome tweeter (silk/textile) | Dry brush only | None |
| Dome tweeter (metal) | Dry brush + minimal 91% alcohol on swab | Extreme caution |
| Plastic mesh grille | Soapy water + rinse, air dry 2 hours | Full immersion allowed |
| Fabric grille | Vacuum + lint roller (outer side only) | No liquid |
When to Clean vs. Replace
| Symptom | Clean? | Replace? | Professional Verdict |
|---|---|---|---|
| Dust layer visible, no distortion | Yes | No | Routine maintenance |
| Muffled sound, dust visible | Yes | No | Likely effective |
| Crackling at low volume | No | Possibly | Check voice coil gap debris first |
| Torn foam surround | No | Yes | Cleaning accelerates failure |
| Rust on frame or magnet | No | Yes | Internal corrosion present |
| Stiff cone (won’t move 1mm) | No | Yes | Seized voice coil |
Comparison of Cleaning Agents for Stubborn Contaminants
| Contaminant | Safe Agent | Unsafe Agent | Reason |
|---|---|---|---|
| Grease / oil | 91% isopropyl alcohol | Degreaser or soap | Soap leaves conductive residue |
| Soda / sugar residue | Distilled water + light dab | Any solvent | Sugar dissolves; solvents damage polymer |
| Nicotine tar | 91% alcohol + gentle wipe | Vinegar | Acidic vapors corrode terminals |
| Mud (dried) | Dry brush first, then damp microfiber | Rubbing | Wet mud scratches cone surface |
Post-Cleaning Testing Protocol
- Reinstall grilles and reconnect battery.
- Play a frequency sweep (20 Hz – 20 kHz at moderate volume, available on streaming platforms).
- Listen for:
- Even output across all speakers
- No intermittent dropout (cleaning may have moved wiring)
- No new rattles (grille clips fully seated)
Pro tip: After cleaning, run pink noise for 5 minutes at 75 dB to mechanically settle any remaining loose particles away from the gap.
Preventive Maintenance Schedule
| Usage Environment | Cleaning Frequency | Visual Inspection |
|---|---|---|
| Dry / dusty climate (e.g., desert) | Every 3 months | Monthly |
| Humid / coastal | Every 6 months | Quarterly (check for rust) |
| Normal suburban | Annually | Biannually |
| Off-road / construction sites | Every 2 months | Monthly |
Final Verdict
Cleaning car speakers is a low-risk, high-reward maintenance task if you respect material limitations. Use dry methods first, never apply pressure to domes, and isolate foam surrounds from any liquid. When in doubt between cleaning and replacing, measure voice coil resistance with a multimeter—if within spec (±10% of nominal), clean; if open or shorted, replace.
For OEM or high-end aftermarket speakers, consult the manufacturer’s cleaning guidelines; some exotic materials (beryllium tweeters, carbon-fiber cones) require specialized dry-ice or ultrasonic cleaning that is not DIY-friendly.